
1) Vault BackOffice Tool (BO Tool)
This document introduces the procedures related to the Back Office Tool used by BO agents to process documents on a daily basis.
Agents will be guided through the key steps required to understand how the tool operates, allowing them to accurately review and process submitted information.
The Back Office Tool is divided into three basic teams.
- Back-office Approver
- Back-office Reviewer
- Back-office Supervisor
Approver / Reviewer
Approver and Reviewer agents will be in charge of classifying the documents submitted by applicants and qualifying or disqualifying them depending on the validity of the proofs presented. The only difference between these two types of agents is that the Approver classifies the proofs first and then the Reviewer performs the same task.
Agents will face two different scenarios while working with the files uploaded. The first step for the agent will be to log in as an Approver/Reviewer. To do that, they will have to introduce their credentials:

As you can see, the BackOffice menu will be available on the left menu of the main page. Once you click on it, the following section will be displayed:

As shown above, in this section there will be different queues. Each of them will be set differently: some will only have the Approver section and others will also contain the Reviewer and Supervisor options.
Supervisors will have to review the proofs submitted by the approvers and reviewers only if the classification of these two agents differ in the result. This means that if both of them classify the proof with the same parameters, the documents will not be sent to the supervisor’s queue, because there are no discrepancies to review.
As the image above shows, there will be different queues depending on the documentation to review:
- Public Site: Contains the proofs and documentation submitted by applicants through the website.
- Quest: It shows the proofs and documentation submitted by enrollment representatives through the Quest application (this option will be available based on the user’s role).
- Manual Processing: This section allows users to upload documents for a specific enrollment number (this option will be available based on the user’s role).
- Quest Agent Badge: In this section, BO agents will be able to perform the Badge validation process that will be introduced later on (this option will be available based on the user’s role).
- QR Channel: For certain campaigns or channels, Emerios has the ability to provide a QR code to perform the enrollment process.
Public Site & Quest application
If BO agents select one of the first two options (Public site or Quest), the next screen will show, one by one, the documents that were processed previously by the preparer. On the left side of the screen, the document to be analyzed and on the right, the details of the document. The documents in the BackOffice Approver queue will be shown as follows:

1) Enrollment number: The enrollment ID attached to the document will appear at the top left corner.
2) Enrollment status: It shows the current account status with their corresponding color (Pending = Yellow, Qualified/Enrolled = Green, Rejected/Cancelled = Red). The channel through which the accounts was created will also be displayed here.
3) Processing time: Every BO agent will have a maximum of 15 minutes to process a document. The timer will show the time left for the document to get dismissed.
4) Proof section: This section will display the picture of the document submitted by the applicant.
5) Action buttons: We will have three different buttons available in this section:
- Dismiss: This button should not be pressed, unless there is a specific request. By clicking on this button, proofs get deleted from the queue, reason why it should only be used for specific documents and only under request.
- Skip: Press this button if a document should not be processed for any reason. This will not delete the document from the BO Tool as it happens if the Dismiss button is pressed.
- Submit: Once all documents have been tagged and the information needs to be sent for qualification, the Submit button should be pressed. The button will not be available, unless all documents have been processed:

6) Search bar: BO Agents will be able to introduce enrollment numbers to look up information related to that specific account.
7) Proofs section: Here, BO agents will select the corresponding options to process the proof accordingly. Since there are many things to take into consideration, further information will be provided in the Processing Documents section.
8) Requirements: In this section, we will see all the proofs that have been Approved and the ones that are still Required.

9) Applicants and Dependents’ info: Here, we will find the applicant’s PII. As you can see below, the system will show the information that we consider as risk factors. A shipping address will also be displayed, in case there is one available. The same will happen with the dependent’s PII, if any.

10) Application: This section will show the Requirements of the account, such as the type of qualification. The system will provide information on those programs that the applicant selected to apply for the benefit, unless the option selected was income, in which case the income information will be displayed:

11) Toggle page: If there is more than one document available, BO agents will be able to switch between them by using the arrows:

12) Positioning: BO Agents will be able to zoom in and out in the document by clicking on the loupe icons. There will also be a button available to reinstate the picture to its initial position.
Processing Documents
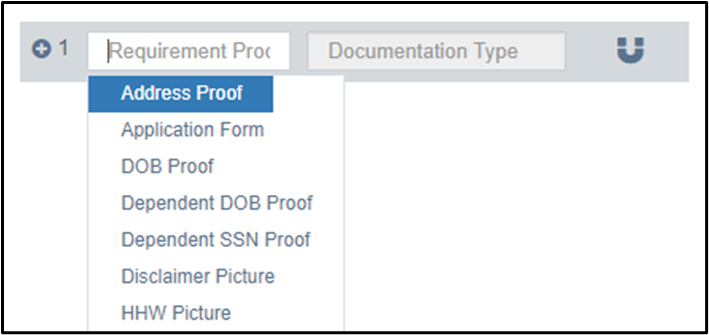
In order to process documents, BO agents will have to refer to the Proofs section. The first thing to do is determining which kind of document the applicant submitted. Normally, this field will already be pre-filled by the BO tool. BO agents will have to make sure that the pre-selection correlates with the proof uploaded:
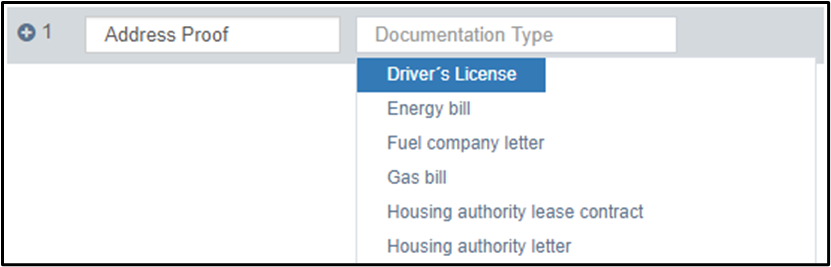
After selecting one of the document types, BO agents will have to select the Documentation Type. The options available in this section will depend on the requirement proof previously selected. For the case below, since the proof selected is for an Address escalation, the documentation type will present only the corresponding proof types that apply for this escalation:
Right after making this selection, the system will show two different icons, for BO agents to select the one that applies. If the proof is valid, the checkmark should be pressed. On the other hand, if the proof is invalid, the cross will have to be clicked:

If the document is deemed valid and the checkmark is pressed, the BO agent will be able to continue with the BO process as usual by processing other documents (if any available) and then, when all the documents have been processed, they should click on the SUBMIT button.
However, if a document has been rejected (by clicking on the cross), the BO tool will present
a pop up where the BO agent will have to provide a rejection reason:

When starting to type, the options from the dropdown menu will become available:

After selecting one of the reasons, there will be a section to introduce additional comments, if needed:

Finally, the Reject button will be available for the BO agent to finish the rejection process.
NOTE: If a proof is Useless, BO agents will have to click on the magnet icon located at the right side of each document. By doing so, the document will be deemed useless:

Once clicked, the proof will look like this:
